1,更新准备源.自己创建一个源文件到/etc/yum.repos.d/目录下,然后更新缓存yum clean all yum make cache 。这里只是其中一个,我也不太记得用了哪个源.自行摸索下。
[remi-php71]
name=Remi's PHP 7.1 RPM repository for Enterprise Linux 7 - $basearch
#baseurl=http://rpms.remirepo.net/enterprise/7/php71/$basearch/
#mirrorlist=https://rpms.remirepo.net/enterprise/7/php71/httpsmirror
mirrorlist=http://cdn.remirepo.net/enterprise/7/php71/mirror
enabled=0
gpgcheck=1
gpgkey=file:///etc/pki/rpm-gpg/RPM-GPG-KEY-remi
[remi-php71-debuginfo]
name=Remi's PHP 7.1 RPM repository for Enterprise Linux 7 - $basearch - debuginfo
baseurl=http://rpms.remirepo.net/enterprise/7/debug-php71/$basearch/
enabled=0
gpgcheck=1
gpgkey=file:///etc/pki/rpm-gpg/RPM-GPG-KEY-remi
[remi-php71-test]
name=Remi's PHP 7.1 test RPM repository for Enterprise Linux 7 - $basearch
#baseurl=http://rpms.remirepo.net/enterprise/7/test71/$basearch/
#mirrorlist=https://rpms.remirepo.net/enterprise/7/test71/httpsmirror
mirrorlist=http://cdn.remirepo.net/enterprise/7/test71/mirror
enabled=0
gpgcheck=1
gpgkey=file:///etc/pki/rpm-gpg/RPM-GPG-KEY-remi
[remi-php71-test-debuginfo]
name=Remi's PHP 7.1 test RPM repository for Enterprise Linux 7 - $basearch - debuginfo
baseurl=http://rpms.remirepo.net/enterprise/7/debug-test71/$basearch/
enabled=0
gpgcheck=1
gpgkey=file:///etc/pki/rpm-gpg/RPM-GPG-KEY-remi
[mariadb]
name = MariaDB
baseurl = https://mirrors.ustc.edu.cn/mariadb/yum/10.2/centos7-amd64
gpgkey=https://mirrors.ustc.edu.cn/mariadb/yum/RPM-GPG-KEY-MariaDB
gpgcheck=1
2,使用命令
yum install mariadb     #最好是新版10.0
mysql -u root -p #连接数据库
mysql_secure_installation;  #初始化数据库
create database ocsweb; #创建数据库
CREATE USER 'ocsweb'@'localhost' IDENTIFIED BY 'password'; #创建本地用户
grant all privileges on ocsweb.* to 'ocsweb'@'localhost' identified by 'password'; # 授权数据库给用户
yum install httpd
yum install php71w-soap php71w php71w-mysql php71w-opcache php71w-pear php71w-pecl-imagick php71w-pecl-apcu php71w-imap php71w-dba php71w-tidy php71w-mcrypt php71w-ldap php71w-xml php71w-pecl-memcached php71w-cli php71w-mbstring php71w-pecl-igbinary php71w-enchant php71w-pecl-xdebug php71w-pecl-redis php71w-embedded php71w-pecl-libsodium php71w-pdo_dblib php71w-fpm php71w-pecl-mongodb php71w-xmlrpc php71w-pspell php71w-pdo php71w-common php71w-phpdbg php71w-pgsql php71w-snmp php71w-process php71w-pecl-geoip php71w-recode php71w-interbase php71w-odbc php71w-bcmath php71w-gd php71w-intl
基本全装了,免得却这个缺那个
yum install perl-XML-Simple perl-Compress-Zlib perl-DBI perl-DBD-MySQL perl-Net-IP perl-SOAP-Lite mod_perl perl-Digest-SHA1 perl-Test-Simple
yum install mod_perl perl-CPAN perl-Archive-Zip perl-Net-IP perl-XML-Simple perl-SOAP-Lite.noarch perl-ExtUtils-Embed perl-XML-Entities
yum install perl-XML-SAX perl-Apache-DBI perl-Apache2-SOAP
yum install httpd-devel
#cpan
>install YAML
>install ModPerl::MM
>install Apache2::SOAP
>install Apache::DBI
3,官方下载相应的最新版ocsng glpi。先安装ocs在安装glpi。按理到这里基本没什么问题了。有个cas的php扩展我没装了。单点登陆暂时用不到。
4,给写权限。默认我开了seLinux。所以需要给写权限。当然你可以直接关闭selinux。我不建议哦!
chcon -R -t httpd_sys_content_rw_t /usr/share/ocsinventory-reports/config  #ocs配置目录写权限,你也可以全部给。后面再关。
chcon -R -t httpd_sys_content_rw_t /var/www/html  #glpi默认目录写权限,也就是根目录
5,解决glpi新版安装最后三个警告。当然你关了的话一般不会弹出。
setsebool -P httpd_can_network_connect on
setsebool -P httpd_can_sendmail on
setsebool -P httpd_can_network_connect_db on
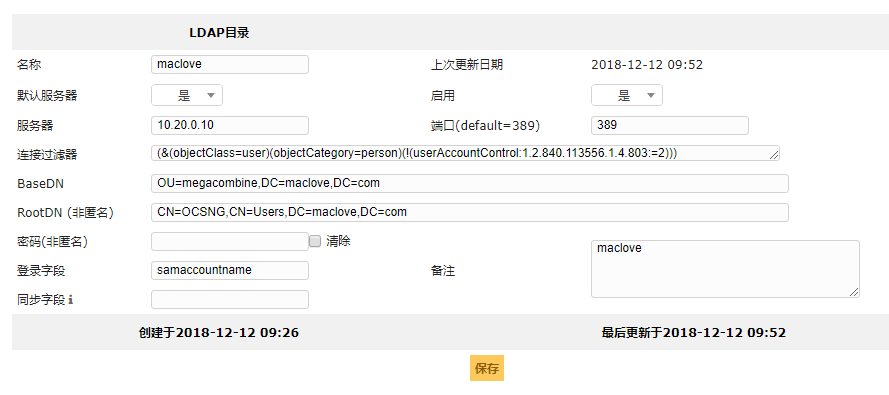
6,设置glpi ldap同步,设置如下图
过滤如下
(&(objectClass=user)(objectCategory=person)(!(userAccountControl:1.2.840.113556.1.4.803:=2)))
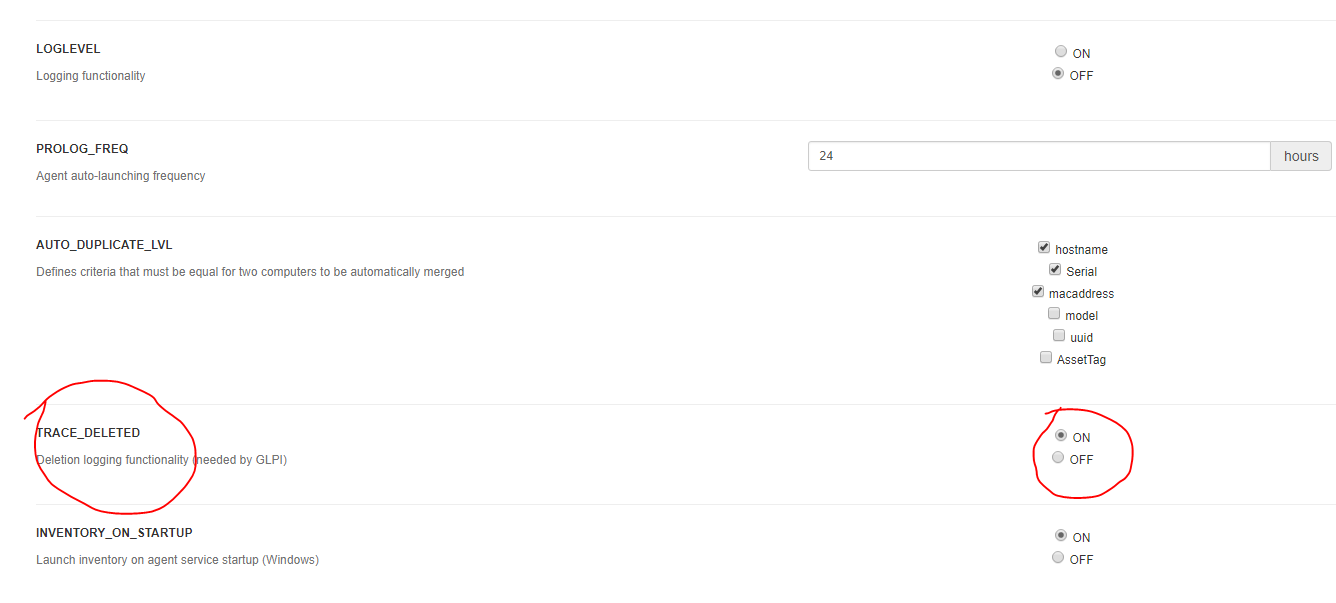
7,ocs请打开这里。默认用户名admin admin glpi glpi